Table of Contents Show
Do you want to switch WordPress from HTTP to HTTPS and install an SSL certificate on your website? We’ve received a lot of inquiries about this because Google announced that starting July 2018, the Chrome browser will mark all non-SSL websites as unsafe. In this article, we will show you how to successfully switch WordPress from HTTP to HTTPS by adding a certificate SSL.
What is HTTPS?
HTTPS stands for Hypertext Transfer Protocol Secure. It is an encrypted version of the standard HTTP protocol. This means that all data sent between your device and the remote server is encrypted. This prevents any third party from listening in on your communication. You should always check if a website is using HTTPS before entering sensitive information like credit card numbers.
Now you’re probably wondering why I need to switch my WordPress site from HTTP to HTTPS, especially if it’s a simple blog or small business website that doesn’t charge any fees?

Why do you need HTTPS and SSL?
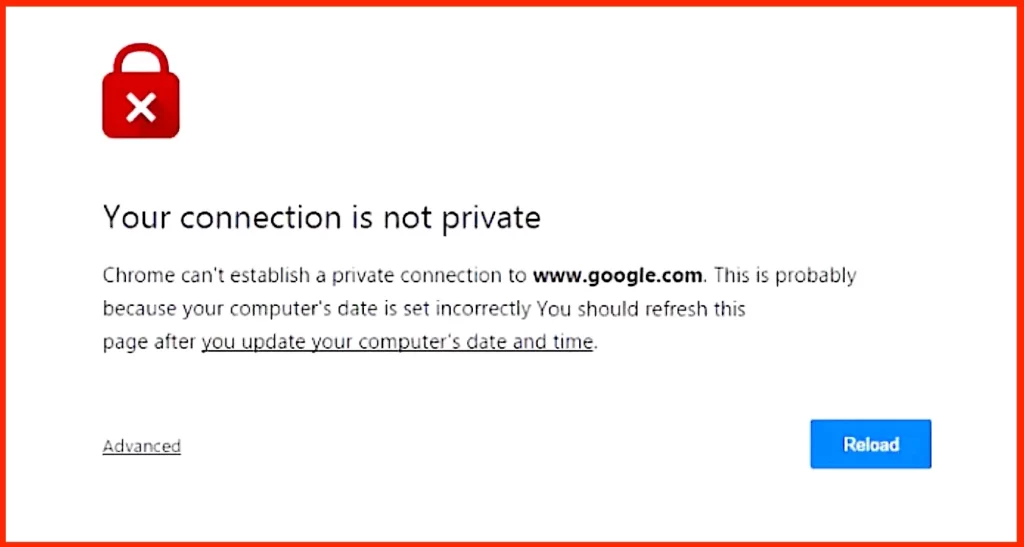
In 2017, Google announced a plan to encourage website owners to make the transition from HTTP to HTTPS. Starting in July 2018, Chrome will warn users when they visit sites that aren’t secured using an SSL certificate. This could lead to a decrease in traffic to unsecured sites, but also means that any sensitive information sent via insecure connections may be at risk.
Requirements for using HTTPS/SSL on a WordPress Site
The requirements for the use of SSL in WordPress aren’t very high. All you want to do is buy an SSL certificate, and you would possibly have already got it for free.
The best WordPress hosting companies are offering free SSL certificates for all their users:
Setting up WordPress to Use SSL and HTTPS
After you have activated the SSL certificate for your domain name, you need to configure WordPress to use the SSL and HTTPS protocols on your website. We will show you two methods to do this and you can choose the one that best suits your needs.
Method 1: Setup SSL/HTTPS in WordPress Using a Plugin
This method is easier and recommended for beginners.
First, you need to install and activate the Really Simple SSL plugin. For more details, see our step-by-step guide on how to install a WordPress plugin.
Upon activation, you need to visit Settings » SSL page. The plugin will automatically detect your SSL certificate, and it will set up your WordPress site to use HTTPS.
The plugin will take care of everything including the mixed content errors. Here’s what the plugin does behind the scenes:
- Check SSL certificate
- Set WordPress to use https in URLs
- Set up redirects from HTTP to HTTPS
- Look for URLs in your content still loading from insecure HTTP sources and attempt to fix them.
While the plugin says you may keep SSL and properly deactivate the plugin, it’s now no longer 100% true. You will depart the plugin lively always due to the fact deactivating the plugin will deliver lower back combined content material errors.
Method 2: Setup SSL/HTTPS in WordPress Manually
This method requires you to troubleshoot troubles manually and edit WordPress files. However, that is an everlasting and extra overall performance optimized solution. This is what we’re the usage of on WPBeginner.
As part of this method, you may need to edit WordPress theme and code files.
First, you need to visit Settings » General page. From here you need to update your WordPress and site URL address fields by replacing http with https.

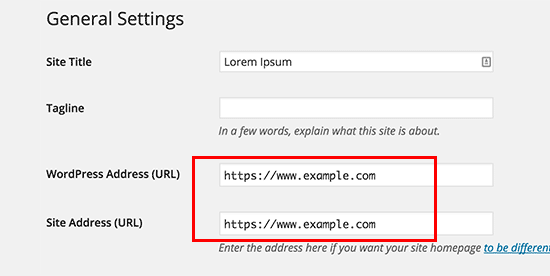
Once the settings are saved, WordPress will log you out, and you will be asked to re-login.
Next, you need to set up WordPress redirects from HTTP to HTTPS by adding the following code to your .htaccess file.
<IfModule mod_rewrite.c>
RewriteEngine On
RewriteCond %{HTTPS} off
RewriteRule ^(.*)$ https://%{HTTP_HOST}%{REQUEST_URI} [L,R=301]
</IfModule>
If you are on nginx servers (most users are not), then you would need to add the following code to redirect from HTTP to HTTPS in your configuration file:
server {
listen 80;
server_name example.com www.example.com;
return301 https://example.com$request_uri;
}
Don’t forget to replace example.com with your own domain name.
By following these steps, you will avoid the WordPress HTTPS not working error because WordPress will now load your entire website using https.
If you want to force SSL and HTTPS on your WordPress admin area or login pages, then you need to configure SSL in the wp-config.php file.
Simply add the following code above the “That’s all, stop editing!” line in your wp-config.php file:
define('FORCE_SSL_ADMIN', true);This line allows WordPress to force SSL / HTTPS in WordPress admin area.
Once you do this, your website is now fully set up to use SSL / HTTPS, but you will still encounter mixed content errors.
You can find out which content is served through insecure protocol by using the Inspect tool. The mixed content error will be displayed as a warning in the console with details for each mixed content item.
Fixing Mixed Content in WordPress Database
The majority of the incorrect URLs will be images, files, embeds, and other data stored in your WordPress database. Let’s fix them first.
All what you need to do is find all mentions of your old website URL in the database that started with http and replace it with your new website URL that starts with https.
You can easily do this by installing and activating the Better Search Replace plugin.
Upon activation, you need to visit Tools » Better Search Replace page. Under the ‘Search’ field, you need to add your website URL with http. After that, add your website URL with https under the ‘Replace’ field.

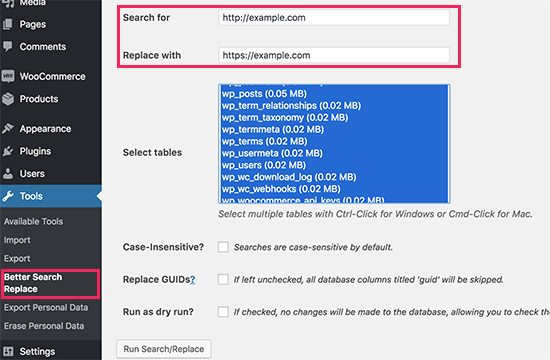
Below that, you will see all your WordPress database tables. You need to select all of them to run a thorough check.
Lastly, you need to uncheck the box next to ‘Run as dry run?’ option and then click on ‘Run Search/Replace’ button.
The plugin will now search your WordPress database for URLs starting with http and will replace them with secure https URLs. It may take a while depending on your WordPress database size.
Fixing Mixed Content Errors in WordPress Theme
Another common culprit that causes a mixed content error is your WordPress theme. Any decent WordPress theme that follows WordPress coding standards will not cause this problem.
First, you will need to use your browser’s Inspect tool to find the resources and where they are loading from.
After that, you’ll want to locate them in your WordPress subject matter and update them with https. This can be a bit tough for maximum beginners, as you’ll now no longer be capable of seeing which subject matter documents comprise those URLs.
Fixing Mixed Content Errors Caused by Plugins
WordPress plugins load some mixed content resources. Any WordPress plugin that follows WordPress coding standards will not cause mixed content errors.
We do not recommend editing WordPress plugin files. Instead, you should contact the author of the plugin and let them know. If they don’t respond or can’t fix the problem, you need to find a suitable alternative.
Note: If for some reason you are still encountering a mixed content error, we recommend that you temporarily use the Simple SSL plugin so that your users are not impacted while you troubleshoot the issue on a temporary website or hire a developer.
Submit Your HTTPS Site to Google Search Console
Search engines like Google consider https and http as two different websites. This means you need to tell Google that your site has moved to avoid SEO issues.
To do that, you just need to go to your Google Search Console account and click on ‘Add a Property’ button and then you need to add your website’s new https address.
After that, Google will ask you to verify ownership of your website. There are several ways to do that, select any method and you will instructions to verify your site.
Once your site is verified, Google will start showing your search console reports here.
You also need to make sure that both the https and http versions are added in your Search Console.
This tells Google that the https version of your site should be treated as the primary version. Combined with the 301 redirects you set up earlier, Google will transfer your search rankings to the https version of your site and you will most likely see improvements in your search rankings.